Experimental study of effect of post processing on fracture toughness and fatigue crack growth performance of selective laser melting Ti-6Al-4V
Haiying ZHANG, Dengke DONG, Shaopu SU, An CHEN
Aircraft Strength Research Institute, Xi’an 710065, China
Received 18 July 2018; revised 18 August 2018; accepted 24 October 2018
Available online 3 January 2019
KEYWORDS
Fracture toughness;
Fatigue crack growth;
Heat treatment;
Selective laser melting;
Surface roughness
Abstract For Ti-6Al-4V, a titanium alloy increasingly used in aerospace structure, selective laser melting (SLM) is an attractive additive manufacturing technology, which is attributed to its complex construction capability with high accuracy and good surface quality. In order to obtain qualified mechanical properties, SLM parameters and post processing should be tailored for diverse service conditions. Fracture toughness and fatigue crack growth (FCG) behavior are critical characteristics for damage tolerance evaluation of such metallic structures,and they are affected by post processing technologies significantly.The objective of this study is to obtain the fracture toughness and fatigue crack growth behavior of Ti-6Al-4V manufactured by SLM, and to evaluate the influence of post-SLM thermomechanical treatment and surface machining. Fracture toughness and FCG tests were performed for SLM Ti-6Al-4V in three types of post processing status:as-built,heat treated and hot isostatically pressed (HIPed), respectively. Specimens with as-built and machined surface were tested. The microstructure and fractography were analyzed as well in order to investigate the relevance among manufacture process, microstructure and mechanical properties. The results demonstrate that as-built SLM Ti-6Al-4V presents poor ductility and FCG behavior due to martensitic microstructure and residual stresses. Both heat treatment and hot isostatic pressing improve the plane-stress fracture toughness and FCG performance considerably, while surface machining shows slight effect.
1. Introduction
Additive manufacturing (AM) by high energy density beam(HEDB), such as laser, electron beam, and plasma arc, fabricates parts layer-wise through successive deposition of materials.Therefore,AM technologies could manufacture parts with complex configuration which could be impossible to get with conventional manufacturing processes, and reduce raw material waste, which is important for expensive materials,such as titanium alloy.1,2Titanium alloy Ti-6Al-4V has been increasingly used in aerospace structures due to its excellent corrosion resistance, damage tolerance performance and compatibility with composites, but it is very difficult to machine from cast or forged billets.Kinds of AM technology,including laser engineered net shaping (LENS),3selective laser melting(SLM),4electron beam melting(EBM)5,6and wire+arc additive manufacture (WAAM)7,8, are currently available for titanium parts fabrication, and numerous works have been performed to evaluate the effects of AM process parameters on the microstructure and quasi-static properties of parts fabricated.3,4,9-11
SLM is capable of building complex parts with high surface quality and good repeatability. Fast cooling rate during SLM process leads to microstructure changes, residual stress and thus different mechanical properties compared with cast or wrought materials4,9-11Numerous pores and lack of fusion defects may also exist due to inappropriate process parameters.9-13Therefore, to apply this attractive technology to load-bearing structures, it is crucial to understand and establish the relationship among the building process, microstructures and properties of the result parts. Besides, the effects of post-SLM heat treatment and surface treatment are also needed to be figured out to decide what kind of post processing should be carried out for specific service conditions.
In general, as-built SLM Ti-6Al-4V exhibits very fine martensitic phase in microstructure, which results in higher strength but less ductility compared with conventional material state.9-14Process inherent defects have a major influence on the fatigue performance of laser additive manufactured Ti-6Al-4V,15and it was noted that regions of porosity were responsible for early crack initiation and thus limited the fatigue life of the parts.16Hooreweder et al.compared the fracture toughness and fatigue crack growth(FCG)properties of SLM Ti-6Al-4V with those of vacuum arc remelted (VAR) mill annealed standard oxygen material17. Since the two materials have approximately the same density, Hooreweder and the coauthors believed that it was the fine martensitic phase rather than the defects or pollution in SLM Ti-6Al-4V that caused the lower fracture toughness and faster FCG. Edwards and Ramulu conducted fracture toughness and FCG tests for SLM Ti-6Al-4V using compact tension (C(T)) specimens built in three orientations.18The horizontal orientation, which means the crack plane transverse to the build layer, has the highest fracture toughness. However, no noticeable difference in FCG behavior was found with respect to the build orientation. The authors inferred that the residual stress in as-built SLM condition overshadowed influences of microstructure and orientation on FCG performance.
Post-SLM heat or thermomechanical treatment above β transus temperature would lead to grain growth,and thus better ductility,fatigue resistance and crack propagation behavior for SLM Ti-6Al-4V.9,19Hot isostatic pressing (HIP) can also reduce pores considerably.9A number of studies have been reported about the effects of post processing on the quasistatic and fatigue properties.20-25The fatigue limit of as-built sample is about 40% less than standard value for Ti-6Al-4V due to poor surface quality, and surface polishing combined with proper HIP process improves the fatigue limit comparable to that of wrought material.13However, limited literatures have been published about the effect of post processing on FCG behavior and fracture toughness,which are crucial properties for damage tolerance assessment of fabricated parts.Leuders et al. compared the FCG performance of SLM TI-6Al-4V in as-built condition, heat-treated at 800°C, heattreated at 1050°C and HIPed at 920°C and 1000 bar.19Heat-treated (including HIPed) materials, similar to conventionally processed Ti-6Al-4V,present FCG rate that is considerably lower than that of as-built SLM material. Therefore,more experiments are needed to gain further understanding of the effect of post-SLM processing.
A series of experiments on the plane-stress fracture toughness and FCG performance of SLM Ti-6Al-4V are presented in this paper. Specimens in as-built SLM condition, heat treated at 780°C and HIPed at 940°C,with as-built and machined surface were tested to evaluate the effect of thermomechanical treatment and surface machining. Observations using optical microscope (OM) and scanning electron microscope (SEM)were also carried out to find the reason at microstructure level.The experimental evidence provides quantitative evaluation and insights into the mechanism of the effect of post-SLM processes.
2. Materials and experimental methods
2.1. Ti-6Al-4V powder
The chemical composition of Ti-6Al-4V powder is shown in Table 1. The powder is spherical in shape, and 95.1% (in weight) has a particle size between 20 μm and 53 μm.
2.2. Specimen fabrication
K-R curve determination test was conducted to derive the plane-stress fracture toughness. For both K-R curve and FCG rate tests, standard C(T) specimen geometry, as shown in Fig.1,was used.All the C(T)specimens had the same nominal width of 80 mm and thickness of 5 mm. The initial crack size was 16 mm for FCG test and 28 mm for K-R curve test to meet the requirements of respective test standards.
Specimen blanks, as shown in Fig.2(a), were firstly fabricated by SLM using a BLT-S300 machine. The width and length of the blanks were the same as the specimens, and two small holes were at the center of loading holes respectively.Three thin triangular supports on each side were built together with the blanks to avoid out-of-plane deformation in SLM process. The build direction is along the arrow in Fig.2(a),i.e.the loading direction of the C(T)specimens.The SLM process parameters were as follows:laser power:300-450 W;scanning speed: 900-1500 mm/s; hatch distance: 0.08-0.15 mm;layer thickness: 0.06 mm.
After sand blast,Electric Discharge Machining(EDM)was utilized to cut off the triangular supports,and to manufacture the loading holes and notched edges. Knife-edges at the crack mouth of the specimens were also made by EDM for displacement gauge mounting.
2.3. Thermomechanical treatment and surface conditions
Three different material states of the specimens were investigated.The one without any heat treatment is coded as‘‘SLM”.The one heat treated at about 780°C for 4 h in vacuum is coded as ‘‘heat treated”, and those hot isostatically pressed at 940°C and 125 MPa for 1.5 h in argon atmosphere are coded as ‘‘HIPed”.

Table 1 Chemical compositions of Ti-6Al-4V powder used for investigation.
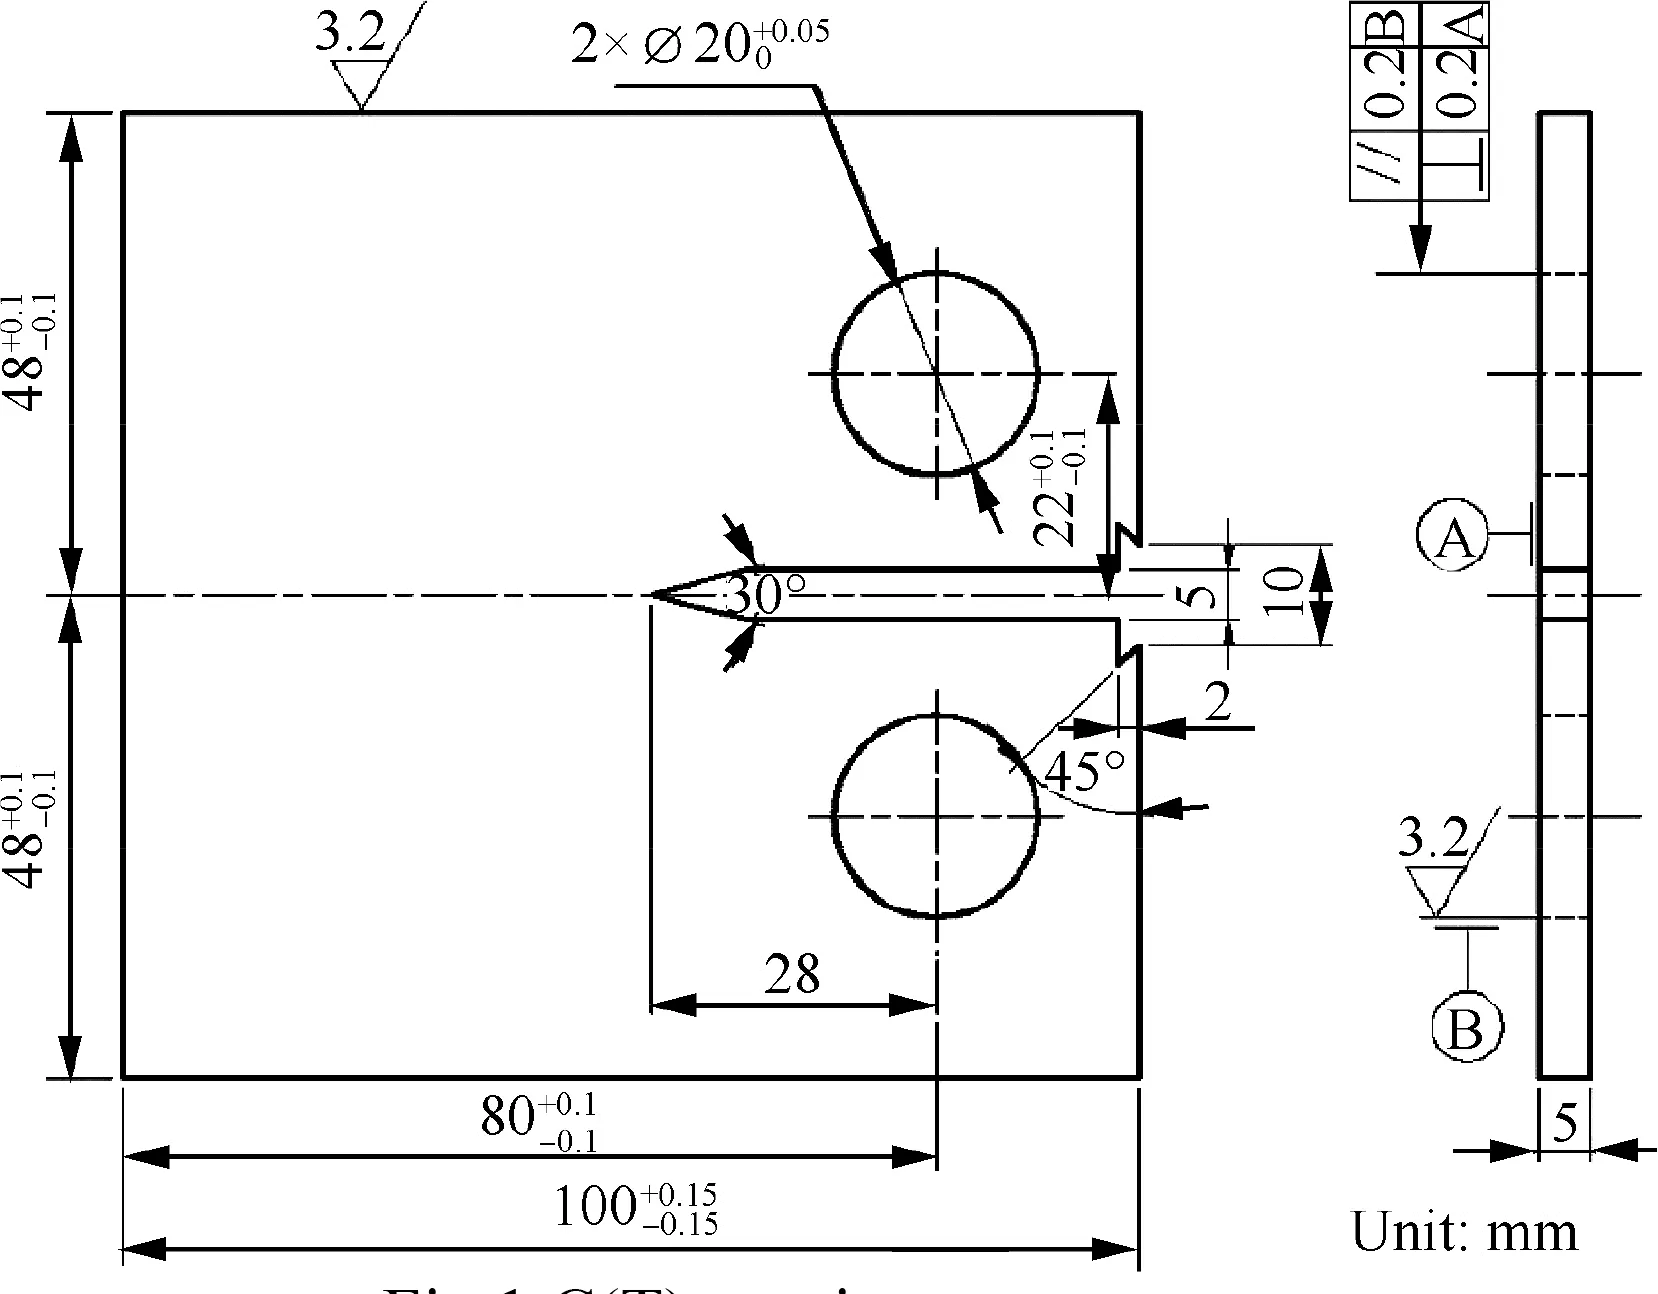
Fig. 1 C(T) specimen geometry.
For each material state, half of the specimens were tested with the original rough surfaces obtained by SLM process,while the others were tested with machined surfaces within the gauge length. These two surface conditions are referred to as ‘‘a(chǎn)s-built” and ‘‘machined”, respectively, as shown in Fig.2(b). Three points for each specimen were selected randomly to measure the surface roughness.
2.4. K-R curve testing
K-R curve tests were conducted according to ASTM E56126standard. Three specimens for each material state and surface condition were tested.The maximum load of 3.5 kN with load ratio of 0.1 was applied at a frequency of 13 Hz for fatigue precracking.The loading rate was 1 mm/s for the static tension.A crack-opening-displacement (COD) gauge was used to measure the crack mouth opening displacements (CMOD). The applied load versus CMOD were recorded and then used to determine the K-R curve, plane-stress fracture toughness(KC) and apparent fracture toughness (Kapp). After the test,the fracture surfaces were observed, and the length of fatigue precrack was measured.
2.5. Fatigue crack growth testing
FCG tests were performed according to ASTM E64727standard. Four or five specimens for each material state and surface condition were tested. Precracking test was firstly conducted to generate around 2 mm fatigue crack from the notch root to ensure that the FCG test was free of the notch root effect. The maximum load of 3.5 kN with load ratio of 0.1 was applied at a frequency of 13 Hz for precracking.FCG tests were conducted at the same load ratio and frequency,and the maximum loads(Ppeak)are shown in Table 2.A COD gauge was used to monitor the crack length by compliance method.27FCG rates as function of the SIF range were deduced from the crack length versus load cycle number data using secant method.
3. Results
3.1. Surface roughness
Measured surface roughness for K-R curve specimens and FCG specimens are shown in Fig.3.For K-R curve specimens,the average as-built surface roughness of SLM and heattreated condition was about 10 μm, and lower, about 7 μm,for HIPed condition. For FCG specimens, the SLM ones had rougher as-built surface, with an average roughness of about 10 μm, while the heat-treated and HIPed ones had an average as-built surface roughness of about 6 μm. After surface machining, the surface roughness was reduced to around 1 μm for all specimens.
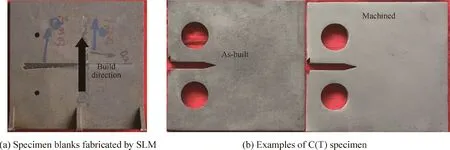
Fig. 2 Photos of blanks and specimens.
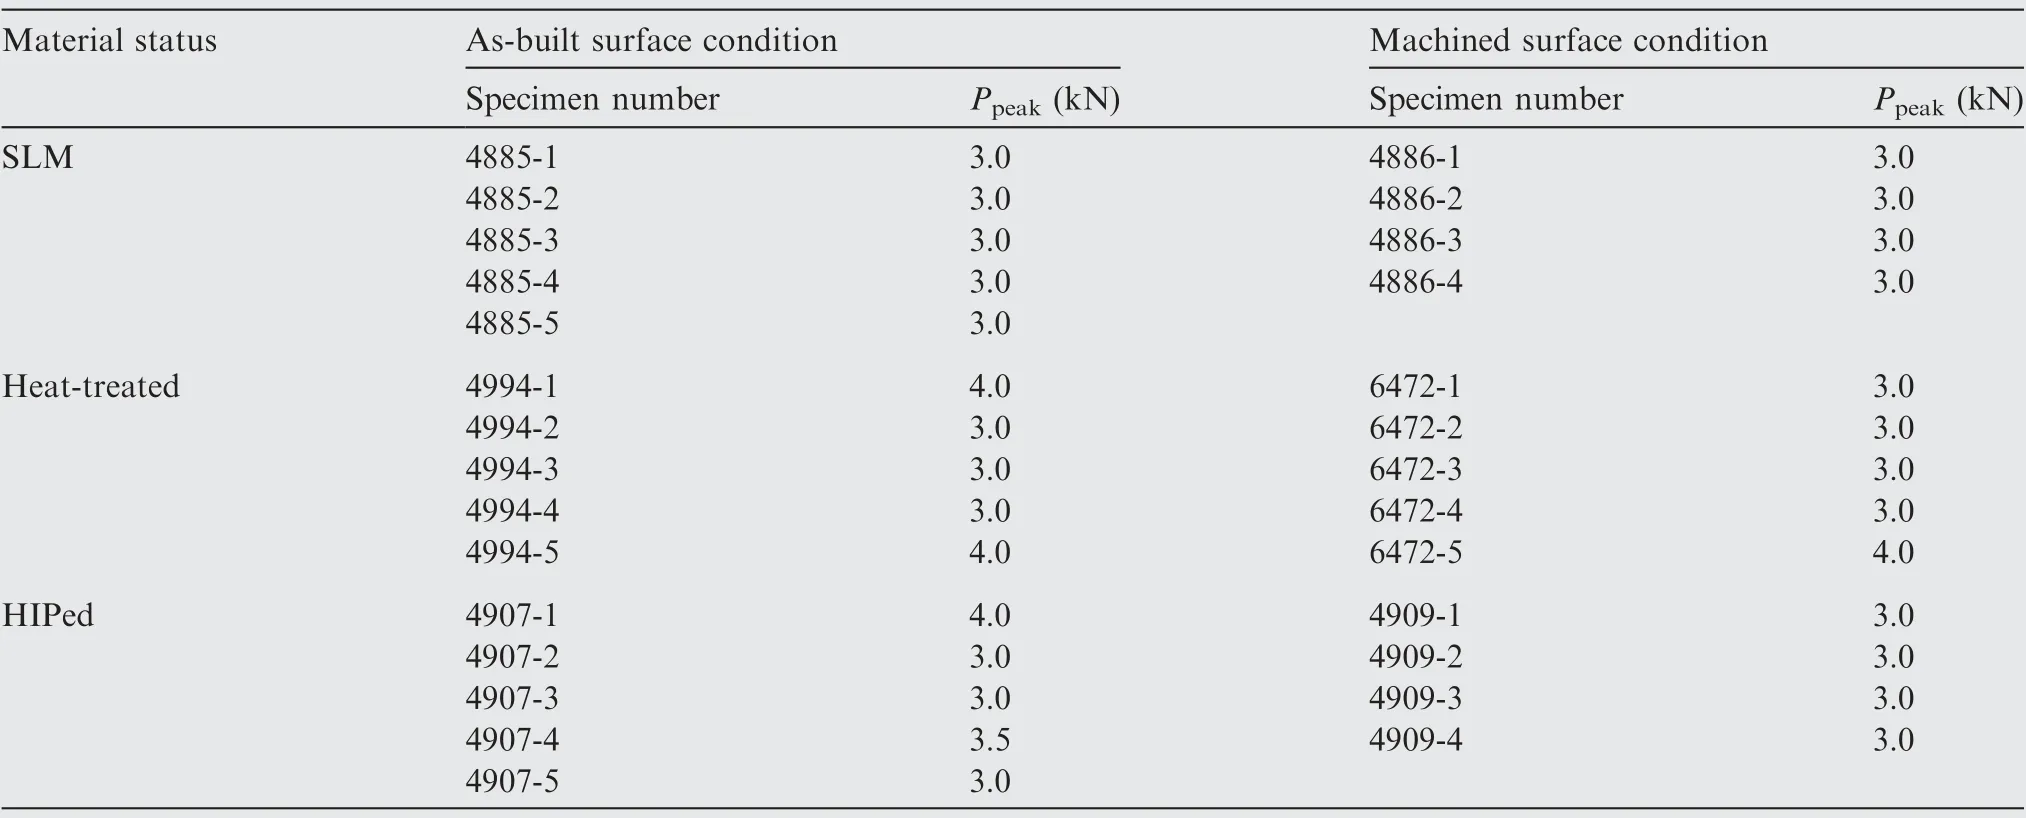
Table 2 Specimen conditions and maximum loads for FCG test.
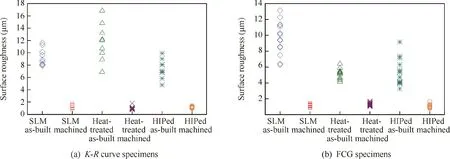
Fig. 3 Surface roughness of specimens.
3.2. Static tensile properties
Static tensile tests were performed for these three different material states and two surface conditions. The specimen was designed to have a gauge dimension of 10 mm×3 mm,with the loading direction along the build direction. Three specimens in each group were tested. The test results are summarized in Table 3. Via heat treatment or HIP, the Young’s modulus of SLM Ti-6Al-4V is slightly increased while the tensile strength is reduced.Both heat treatment and HIP improve the elongation significantly, by 28% at least.
3.3. Microstructure
One specimen in each group of tested tensile specimens was selected for optical observation at microscopic level. The fracture surface was grinded, polished and etched for optical observations. No notable difference was found in the microstructure between specimens with as-built and machined surface for each kind of material status. Therefore, only the optical micrographs of specimens with as-built surface are presented in Fig. 4. For each kind of material status, observed typical defects using optical microscope are shown in Fig. 5.
As reported in Refs.9,12,19,as-built SLM Ti-6Al-4V exhibits martensitic α microstructure. A large number of pores, with diameters over 1 μm to 20 μm, and lack of fusion defects can be seen from the optical micrographs, as shown in Fig.4(a)and Fig.5(a).After heat treatment at about 780°C for 4 h,fine acicular α microstructure is found, as shown in Fig.4(b).Although it is believed that heat treatment alone would not reduce pores significantly in Ti-6Al-4V,9much less pores with diameter around 1 μm are observed,and large pores still exist,as shown in Fig.5(b). Following HIP at 940°C for 1.5 h, the microstructure shows an obvious increase in grain size and β-Ti phase. A few of pores can still be noted. Cracks and several unmolten particles are also observed,as shown in the first and second columns in Fig.5(c).
3.4. Fracture toughness
Fig.6 shows typical load versus CMOD curves measured in KR curve test.For each type of specimens,the one that endured the medium load is selected for the demonstration. As can be seen from the curves, the maximum load and corresponding CMOD of heat-treated and HIPed specimens are double more than those in SLM condition.

Table 3 Tensile properties of SLM Ti-6Al-4V.
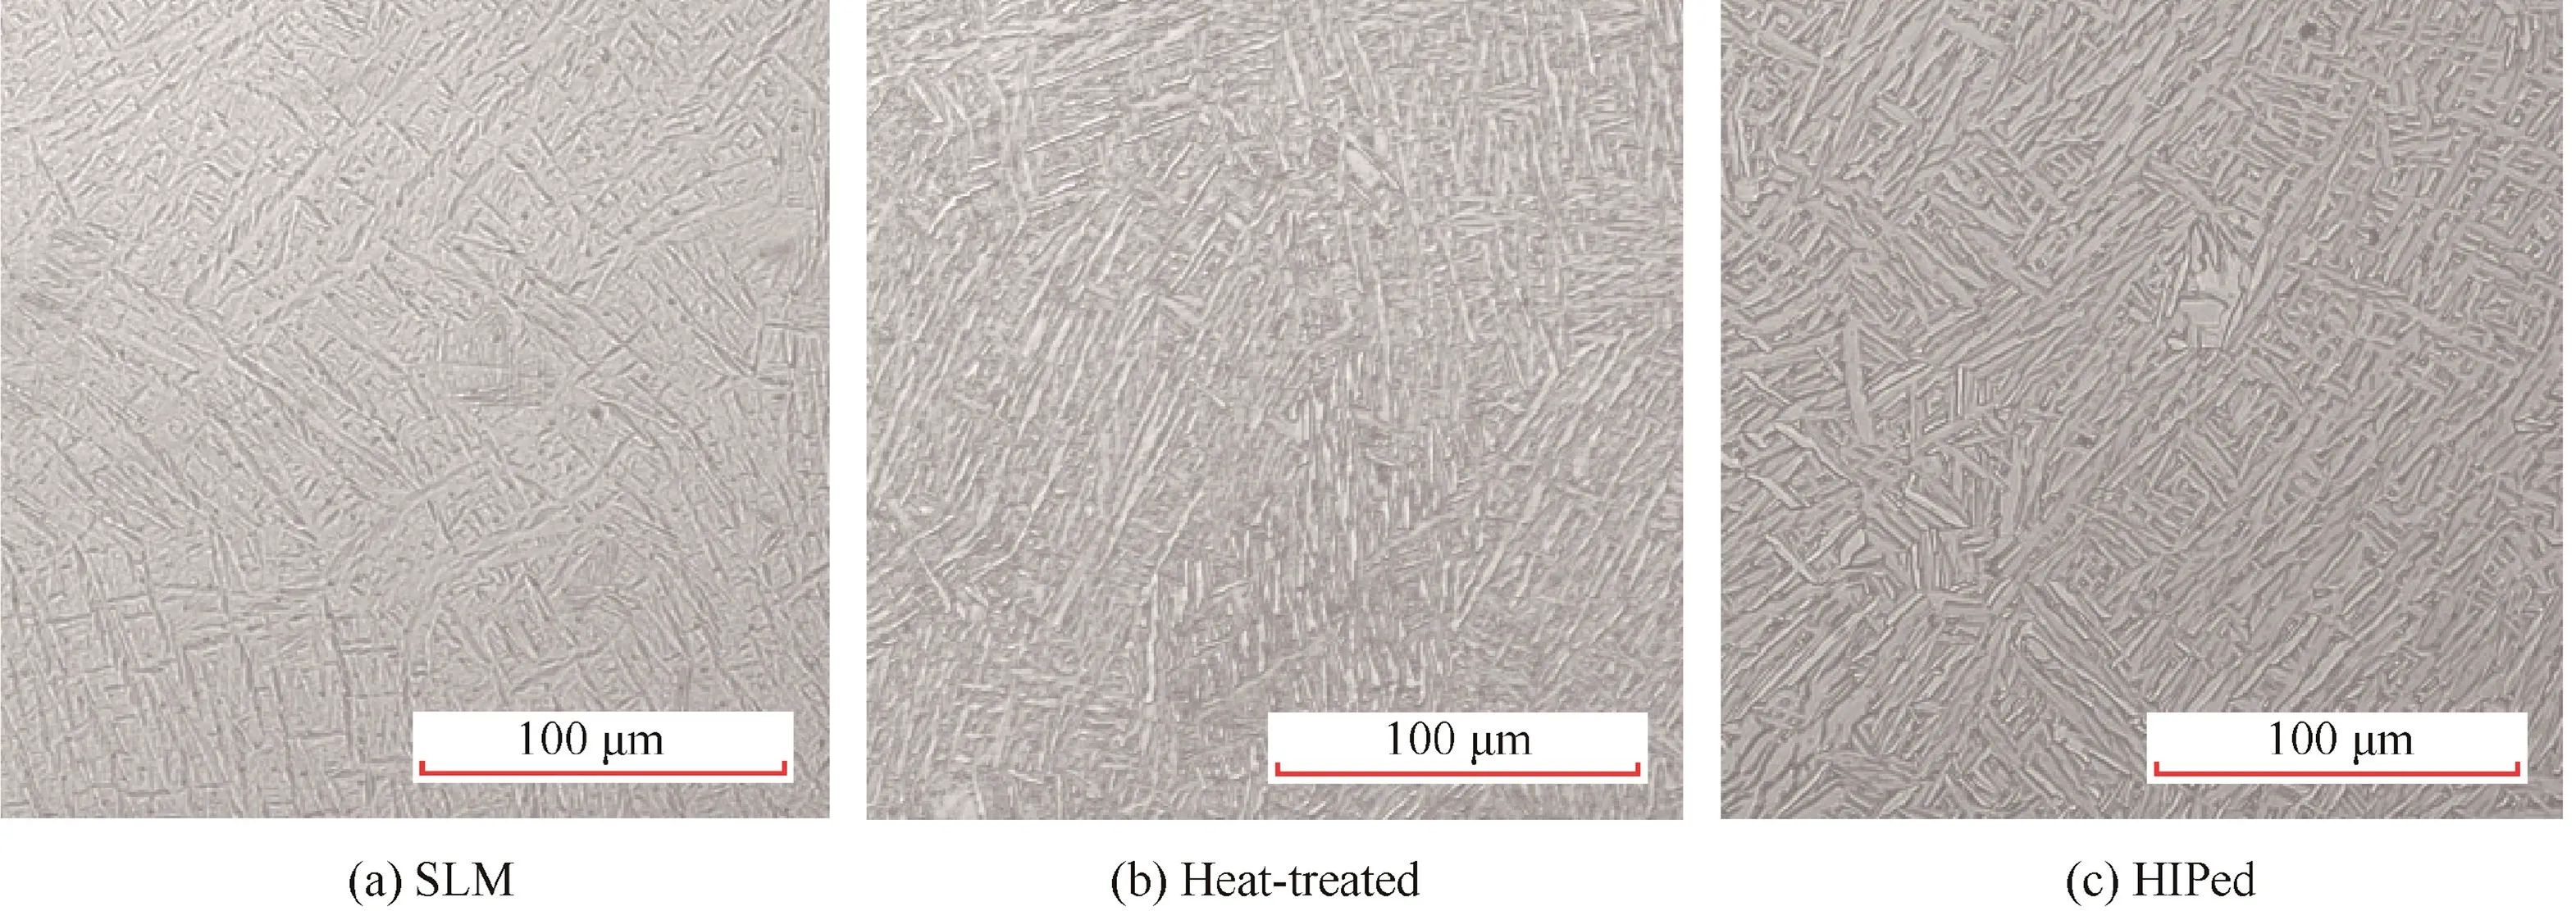
Fig. 4 Optical micrographs of specimens.
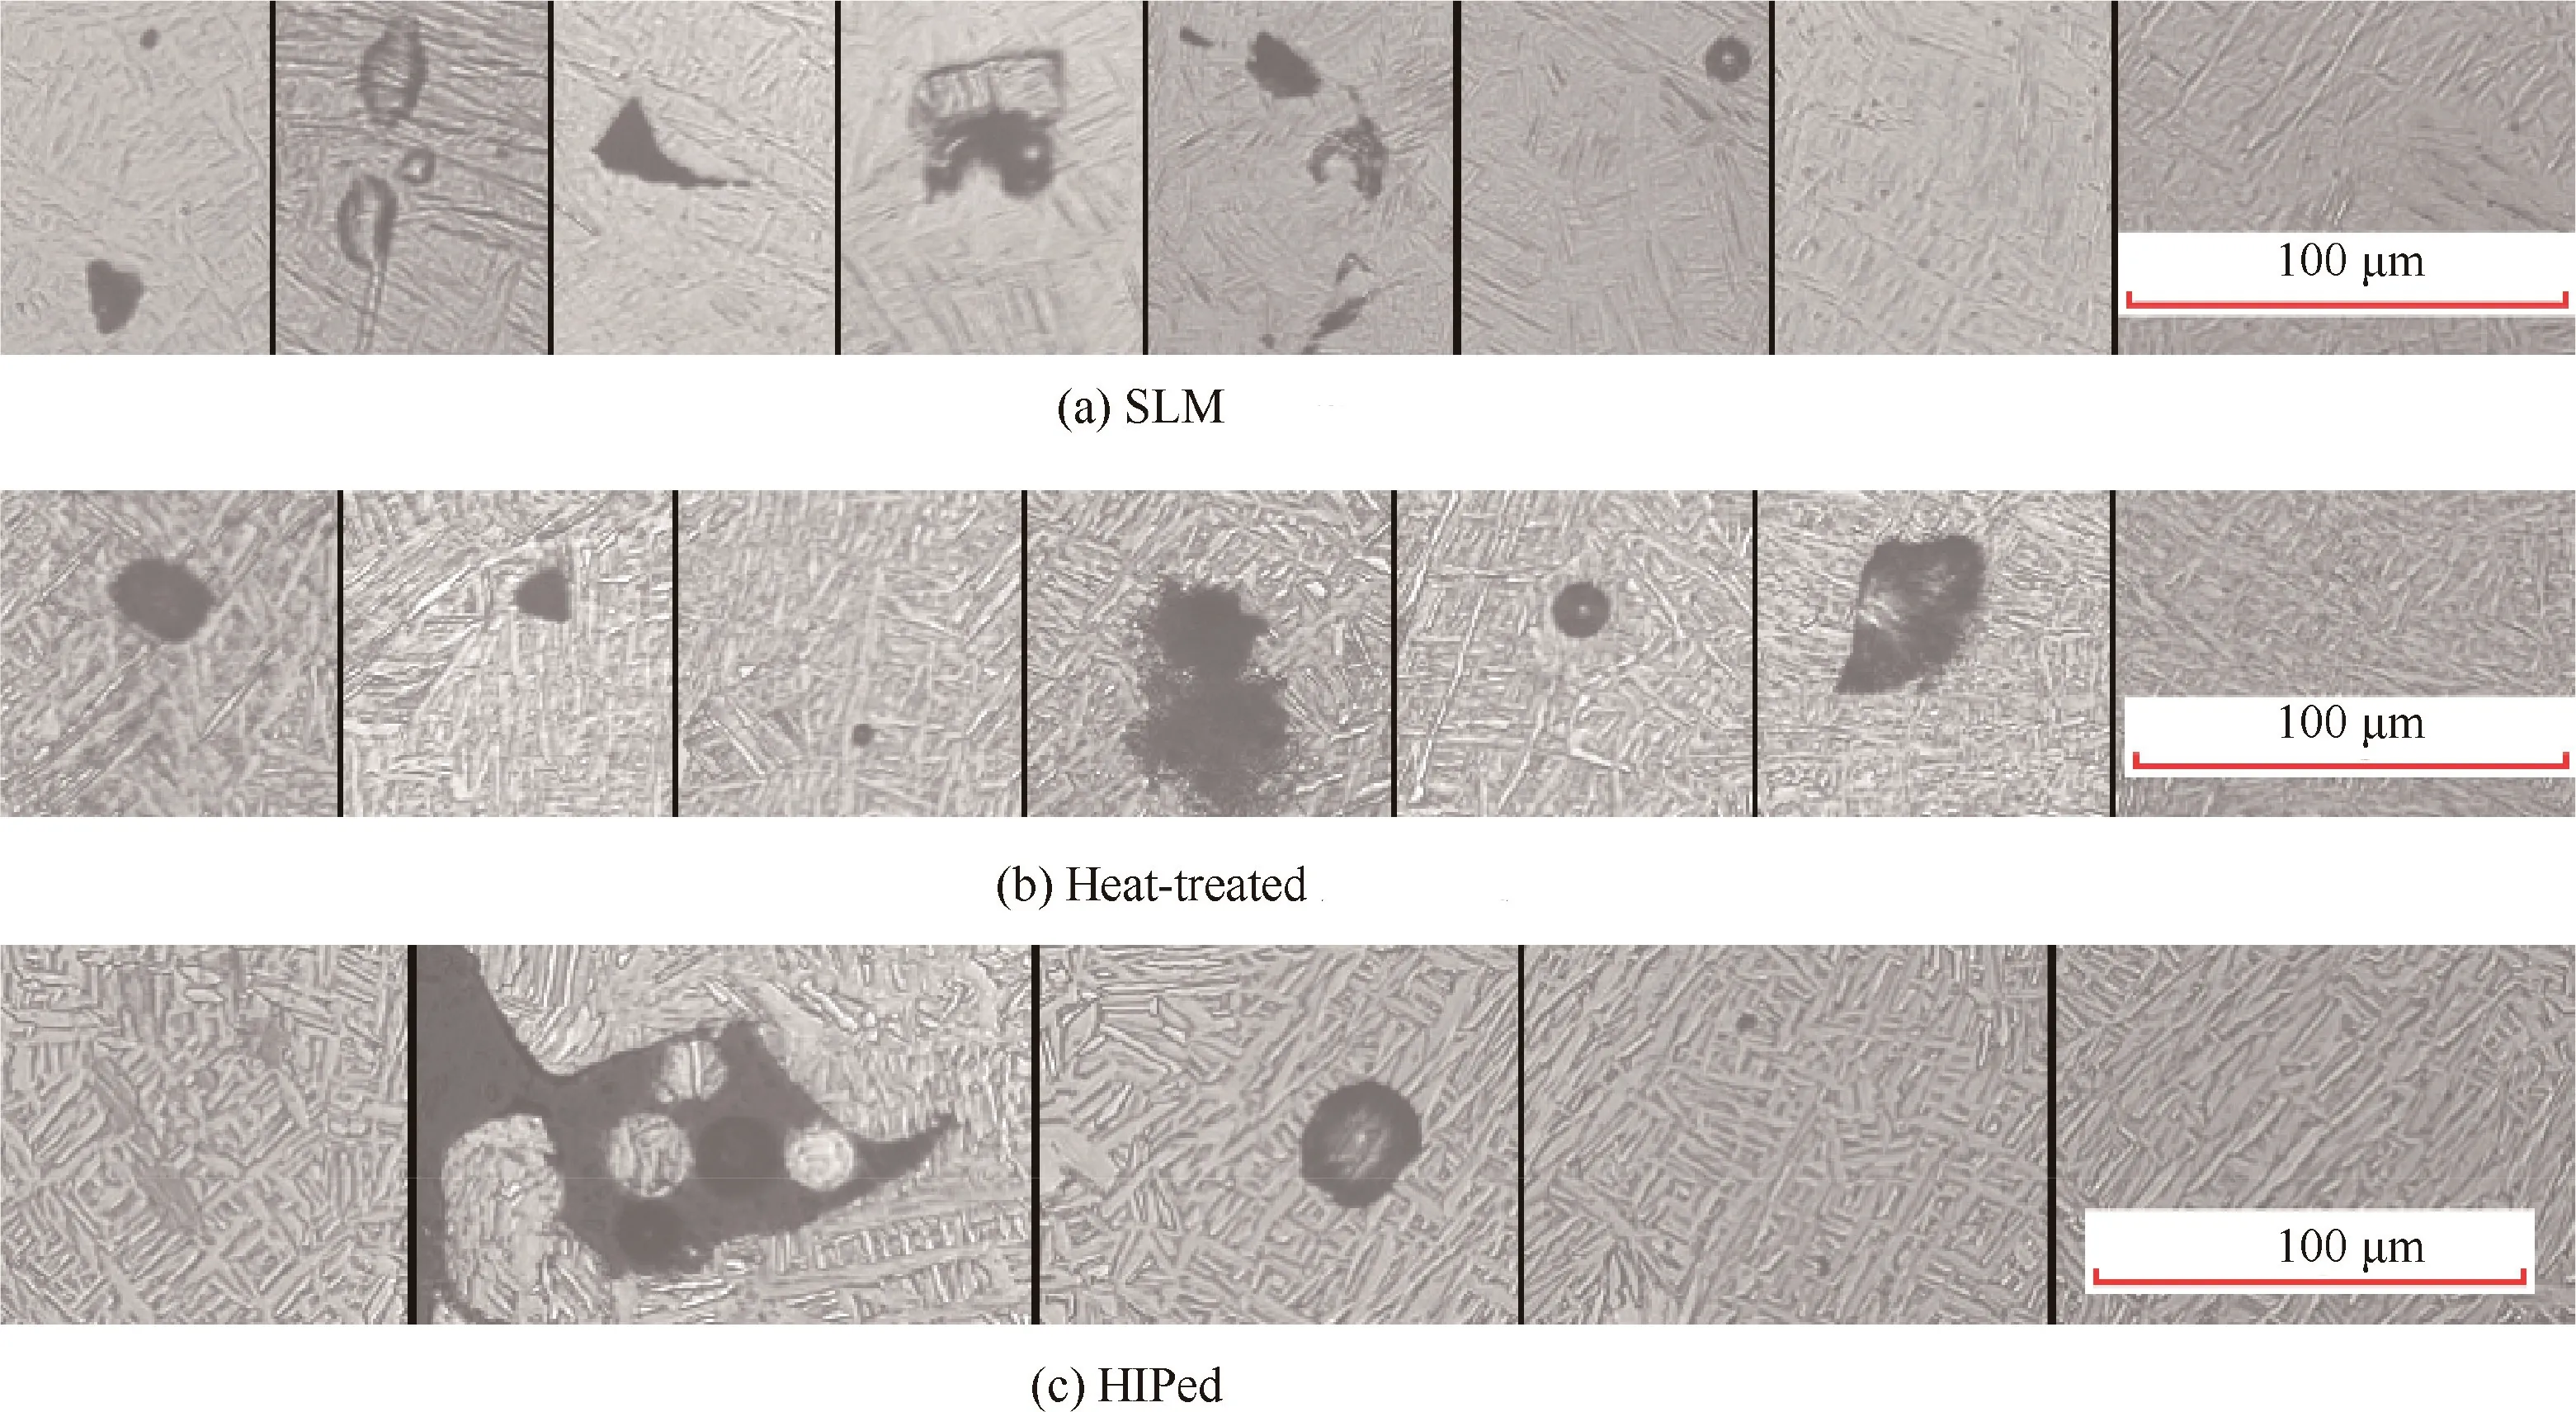
Fig. 5 Observed typical defects using optical microscope.
Measured parameters and fracture toughness derived for each specimen are listed in Table 4. aiis the crack length after fatigue precracking. Pmaxis the maximum load measured during the test. KCis the plane-stress fracture toughness obtained from K-R curve,and Kappis the apparent plane-stress fracture toughness,i.e.the stress intensity factor calculated using aiand Pmax.
The apparent fracture toughness obtained for SLM Ti-6Al-4V is 35.9-46.5 MPa·m0.5in this study, similar with the result of 37-48 MPa·m0.5in Ref.18. The plane strain fracture toughness is approximately 65 MPa·m0.5and 107-109 MPa·m0.5for wrought and cast Ti-6Al-4V, respectively28.Considering that the fracture toughness presented in Ref.18and this study is in plane stress condition, higher value is expected than that in plane strain condition. Thus, SLM Ti-6Al-4V presents quite low resistance to crack extension compared with cast or wrought materials. Heat treatment and HIP increase the fracture toughness considerably. The heattreated specimens show the highest average KC,145.38 MPa·m0.5and 134.06 MPa·m0.5for as-built and machined specimens respectively, around triple that of SLM specimens. KCof HIPed specimens is approximately 7.5%lower than that of heat-treated ones averagely.
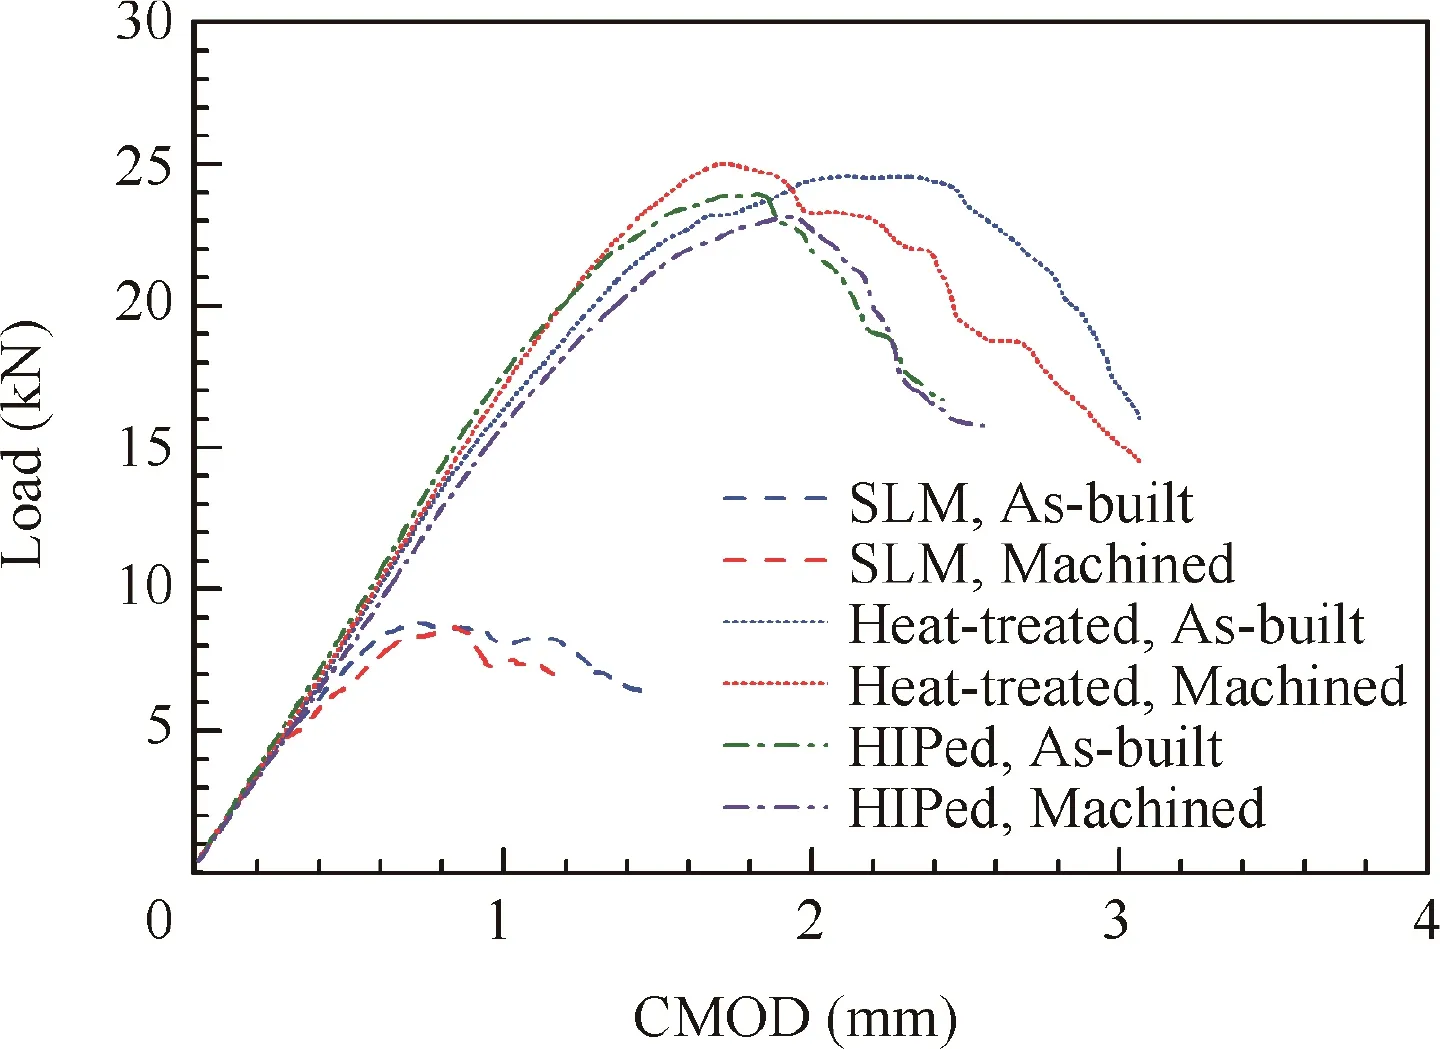
Fig. 6 Measured load versus CMOD in K-R curve test.
As for heat-treated and HIPed specimens, the fracture toughness of specimens with machined surface is slightly higher than that of specimens with as-built surface. However,for SLM specimens,the specimens with machined surface have lower fracture toughness in average. It is noted that one SLM specimen with machined surface yields much lower fracture toughness compared with the other two in the same condition.If this specimen is ignored, SLM specimens with as-built and machined surface have similar fracture toughness. Therefore,it can be inferred that surface machining has slight effect on improving the fracture toughness of SLM Ti-6Al-4V in different material status.
3.5. FCG behavior
Derived FCG rates(da/dn)versus stress intensity factor ranges for SLM Ti-6Al-4V in different conditions are presented in Fig. 7. Data for cast and mill-annealed Ti-6Al-4V29,p.5-91~100are shown in the figures for comparison. As can be seen from Fig.7(a) and (b), SLM Ti-6Al-4V specimens show quite inferior FCG performance, and relatively wider scatter band is observed. After heat treatment or HIP processing, the FCG behavior is improved significantly, better than that of millannealed material, and comparable to that of cast material when the stress intensity factor range ΔK >21 MPa·m0.5.Similar results were observed in Ref.19.
For specimens in SLM condition, no significant improvement in FCG behavior is found after surface machining, as shown in Fig.7(c),but the scatter seems to be reduced.For specimens in heat-treated condition, FCG rate for ΔK <15 MPa·m0.5decreases via surface machining,as shown in Fig.7(d).For specimens in HIPed condition,surface machining hardly improves the FCG behavior,as shown in Fig.7(e).
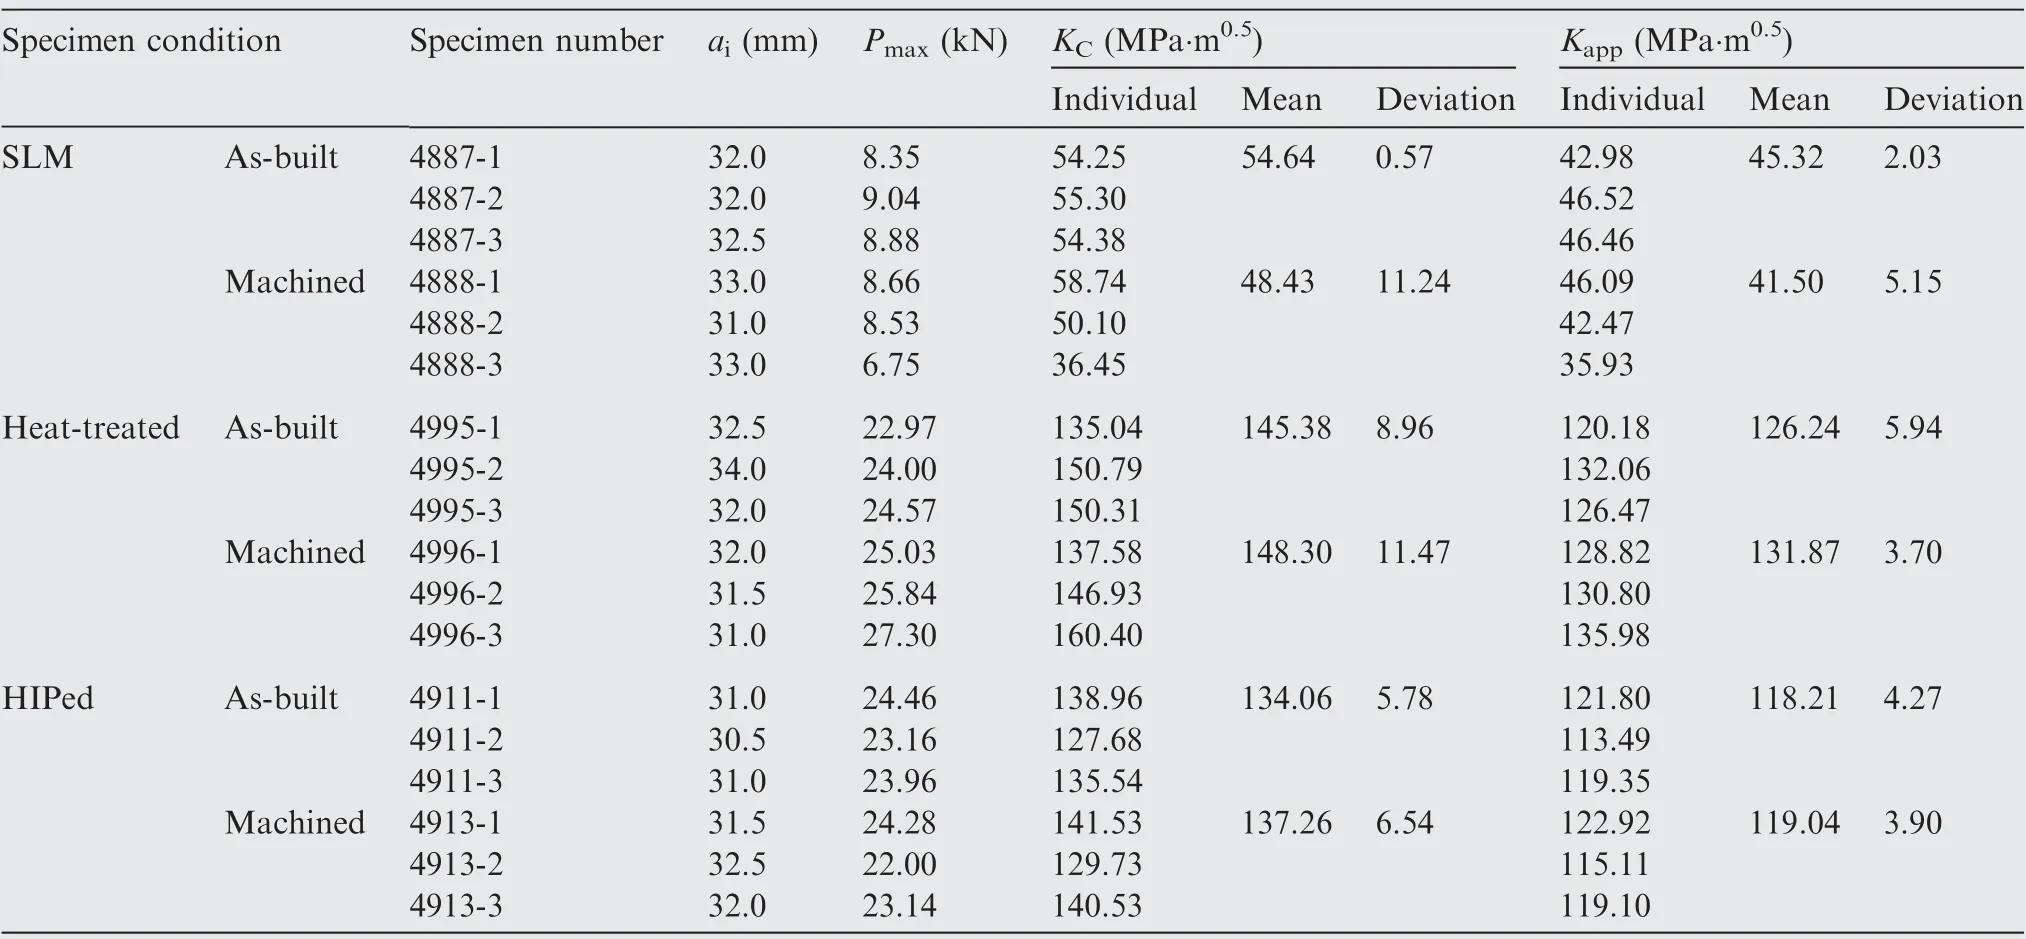
Table 4 Fracture toughness and relevant parameters obtained from K-R curve test.
The fracture surfaces of FCG specimens were observed,and one for each material condition was selected for microscopic analyzation by SEM. The panoramas of the fracture surface and some typical SEM imagines are presented in Figs. 8-10. Firstly, heat-treated and HIPed specimens demonstrate relatively longer flat and smooth section than the SLM one. This is mainly attributed to much more load cycles endured and higher fracture toughness in heat-treated and HIPed specimens. Secondly, numerous pores, lack of fusions(indicated in rectangle in Fig.8(b)), cracks (indicated in hexagon in Fig.8(c)) and delamination (indicated in oval in Fig.8(b))can be observed on the fracture surface of SLM specimen.The crack cluster perpendicular to the fracture surface and the delamination along the fracture surface should be kinds of defects caused by lack of fusion. Crack cluster can still be noticed in the fracture surfaces of heat-treated and HIPed specimens, as indicated in hexagons in Fig.9(b) and Fig.10(c), but the sizes in HIPed specimen are much smaller. Some pores and lack of fusion defects can be found in the heattreated specimen, while few pores are found in the HIPed one. Thirdly, only facets are observed in the FCG regime for SLM specimen, while regular fatigue striations perpendicular to the crack growth direction are found for heat-treated and HIPed specimens, as shown in Fig.8(c), Fig.9(c) and Fig.10(c). Finally, fracture surfaces of all material conditions reveal dimples in the fast fracture regime, as shown in Fig.8(d),Fig.9(d)and Fig.10(d), but the dimples of the SLM one look relatively shallow.

Fig. 7 FCG rate versus stress intensity factor range for Ti-6Al-4V in different conditions.
4. Discussion
4.1. Effect of thermomechanical treatment
As mentioned before9,19-20,22,25, post-SLM thermomechanical treatment could improve mechanical performance by unfavorable microstructure elimination, residual stress relief and porosity decrease. Heat treatment and HIP were carried out separately,and a series of tests,including static tensile,fracture toughness and FCG test, were performed. Though no quantitative measurement of porosity and residual stresses was conducted in this study,microstructure and defects were observed through optical microscope and SEM to gain an insight into the connection between manufacturing processes and fracture mechanics behavior.

Fig. 8 Fractography of FCG specimen in SLM condition.
4.1.1. Effect on static tensile properties
Due to the differences of SLM equipment and building parameters,the ultimate tensile strength of SLM Ti-6Al-4V obtained in the present study, 977.9 MPa for as-built surface and 967.9 MPa for machined surface respectively, are lower than those reported9,10,17,19,23, but higher than that of cast material(882.5 MPa)29. Compared with heat treated or HIPed specimens, SLM specimens exhibit moderately higher strength but much less elongation (Table 3), which indicates poor ductility in SLM condition. The martensitic microstructure in SLM specimen is supposed to be the reason for high strength and poor ductility.
According to Ref.19, 2 h 800°C heat treatment relieves almost all the residual stress of SLM specimens. Therefore,the decreased strength and elongation in HIPed specimens compared with heat-treated ones are believed to be mainly associated with the coarser grains rather than residual stresses.The recovered acicular α-Ti and tiny increase of β-Ti in heattreated specimens improve the elongation, from 4.6%-4.8%to 6.7%-7.5%.
Kasperovich et al.9have demonstrated that optimized SLM parameters could be reached to minimize the porosity. Much fewer and smaller defects were found in HIPed specimens compared with SLM ones. Therefore, the difference of ultimate strength between SLM and HIPed specimens, up to 110 MPa,demonstrates that porosity or defects are not critical factors to static properties.
Therefore,grain sizes and phase fraction should be tailored by SLM process and thermomechanical treatment to reach proper strength and ductility.
4.1.2. Effect on fracture toughness
The small CMOD and inferior fracture toughness in SLM specimens demonstrate being less ductile, which is caused by the martensitic α and large amount of residual stress. As confirmed by the tensile test results, the small size defects have insignificant influence with crack extensions during the static tensile process of fracture toughness test. Therefore, the microstructure evolution together with residual stress relief by heat treatment or HIP improves the fracture toughness considerably (Table 4).
Although the fracture toughness is expected to increase as α lamella width increases,30and HIPed specimens have coarser microstructure than heat-treated ones,KCof HIPed specimens is slightly lower than that of heat-treated ones averagely.It can be seen from Table 4 that one heat-treated specimen for each surface condition exhibits lower fracture toughness than the corresponding HIPed ones. Thus, the scatter band may overshadow the influence of coarser grain in HIPed material in this study.
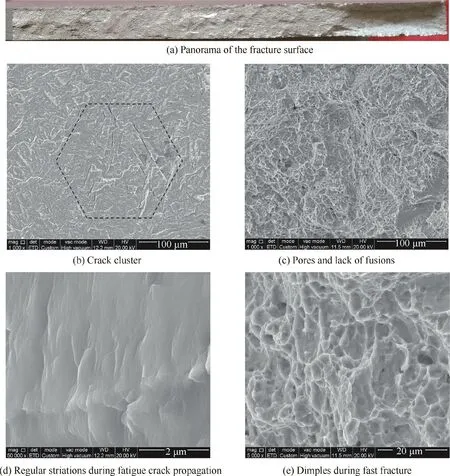
Fig. 9 Fractography of FCG specimen in heat-treated condition.
4.1.3. Effect on FCG behavior
Leuders et al.19believed that residual stress is the key factor to the fundamental difference in FCG between as-built and heattreated (including HIPed) Ti-6Al-4V. Large amount of tensile residual stress would increase the effective stress intensity factor ratio, and increase the FCG rate in consequence.31Moreover, lack of regular striations and shallow dimples indicate poor ductility for specimens in SLM condition, which is consistent with the results of static tensile and fracture toughness test.
As for specimens in heat-treated and HIPed conditions,any residual stress is hardly supposed to remain,and thus the FCG behavior for physically long cracks should be improved with the increase of lamella width.30HIPed specimens with asbuilt surface present better FCG behavior than heat-treated ones when ΔK <20 MPa·m0.5(Fig.7(a)). However, for other cases, no obvious slower FCG rate was found in HIPed specimens.Therefore,less pores and smaller crack luster after HIP hardly improve the FCG performance.
EBM Ti-6Al-4V built in a vacuum chamber at 700°C exhibits low residual stress and apparent fracture toughness of 102 MPa·m0.5,6which is comparable to that of cast material.FCG rate similar with those of heat treated and HIPed SLM specimens was also obtained for EBM Ti-6Al-4V (Fig. 11).Thus, the elevated temperature and slow cooling rate during post-SLM heat treatment, similar with that of EBM process,lead to microstructure evolution and residual stress relief.
Higher temperature (940°C versus 780°C) during HIP results in the growth of α-Ti grain and β-Ti phase, and the pressure in HIP process reduce some defects of SLM Ti-6Al-4V. Defect minimization in parts is important for long crack initiation life.9,19However, HIPed specimens do not present much better performance with regard to static tensile,fracture toughness and FCG in this study. Therefore, post-SLM heat treatment is necessary for parts designed based on damage tolerance philosophy, while HIP is optional unless long fatigue crack initiation life is expected.
4.2. Effect of surface roughness
Measured surface roughness for specimens with as-built surface ranges from 4 μm to 17 μm, with an average value of about 10 μm, slightly lower than reported 15.45 μm23and 13 μm,32and much lower than reported 30.3-38.5 μm in Ref.24. This may be due to inadequate points selected for roughness measurement in this study. The optimized building parameters and sand blast may slightly improve the surface condition as well.
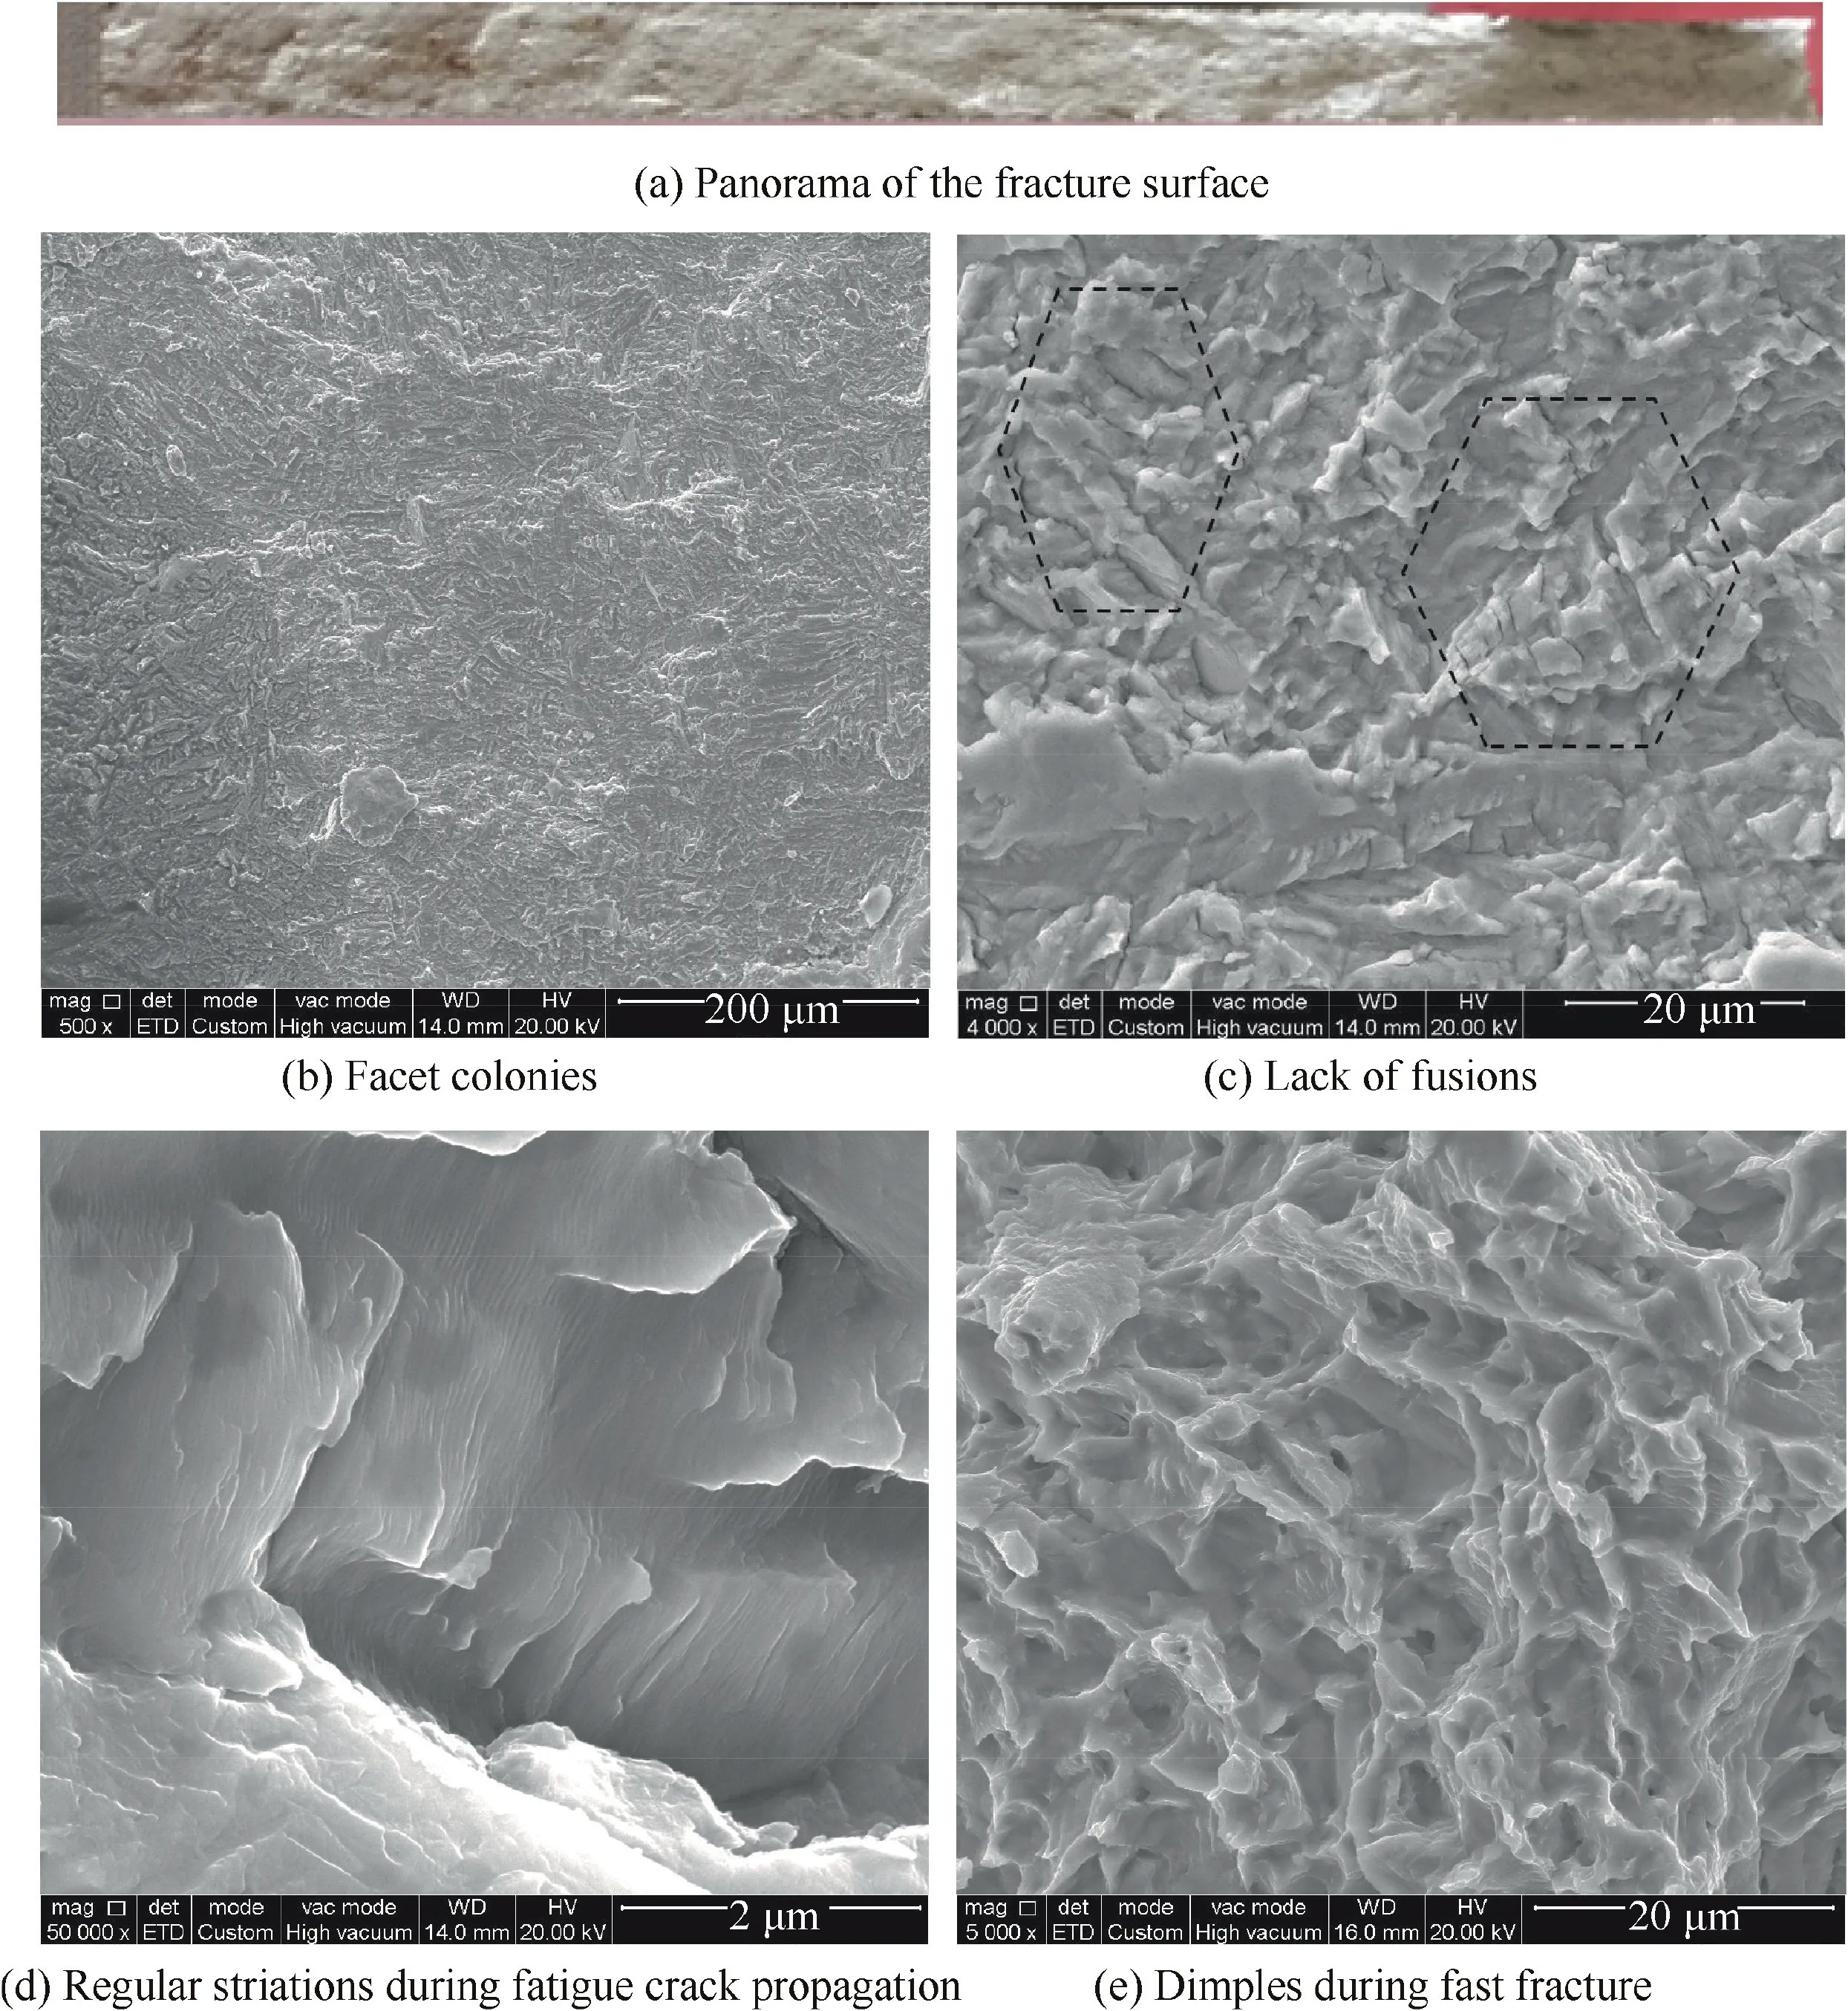
Fig. 10 Fractography of FCG specimen in HIPed condition.
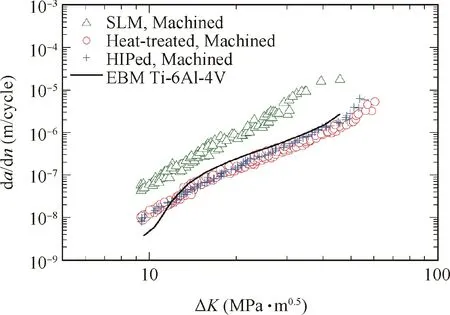
Fig. 11 Comparison of FCG rate between SLM and EBM Ti-6Al-4V.
Though surface machining improved the mechanical properties of some specimens, no overall improvement was found with respect to any particular property. Particularly, it seems that surface machining has more positive influence on heattreated and HIPed specimens compared with SLM specimens.Because residual stress was mostly relieved and some defects were eliminated by heat treatment or HIP, it can be inferred that the influence of residual stress and defects counteract that of surface machining for SLM Ti-6Al-4V. Besides, the influence of surface roughness cannot be confirmed, partly due to the scatter of the test results.
As for fatigue life, because sub-surface imperfections can cause crack initiation and lead to premature fatigue failure,no significant improvement in fatigue life was reported for SLM Ti-6Al-4V.23-24,32However, with the SLM process optimization, fewer defects would remain and surface machining or polishing should be still performed to achieve long fatigue life.
Furthermore, for SLM application in aerospace structure,more comprehensive tests should be performed to tailor the main SLM parameters and post-SLM processes,and to obtain statistical evaluation of mechanical properties.
5. Conclusions
1. Compared with cast or wrought Ti-6Al-4V, as-built SLM Ti-6Al-4V material presented high static strength but poor ductility due to the unfavorable martensitic microstructure.Inferior FCG performance was observed due to the presence of residual stresses.
2. Post-SLM heat treatment or HIP improved the ductility of SLM Ti-6Al-4V considerably. The plane-stress fracture toughness was increased in triple, and FCG rate became comparable to conventionally processed Ti-6Al-4V.
3. Slightly improvement in fracture toughness and FCG behavior was achieved via surface machining.
4. In cyclic loading situations, heat treatment or HIP is recommended for optimal microstructure and mechanical properties. If long crack initiation phase is not vital, thorough surface process could be skipped for cost efficiency.
Acknowledgements
This study was supported by the Innovation Fund of Aircraft Strength Research Institute of China(No.16-025-03).
 CHINESE JOURNAL OF AERONAUTICS2019年10期
- CHINESE JOURNAL OF AERONAUTICS的其它文章
- Design and analysis of a hypersonic inlet with an integrated bump/forebody
- High precision attitude dynamic tracking control of a moving space target
- Guidance laws for attacking defended target
- Closed form algorithm of double-satellite TDOA+AOA localization based on WGS-84 model
- Effects of yaw-roll coupling ratio on the lateraldirectional departure prediction and restraint
- Application of novel force control strategies to enhance robotic abrasive belt grinding quality of aero-engine blades
